LESSON PRESENTATION INSTRUCTIONS
SPACE
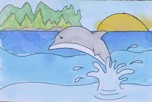
WHALE ON THE HORIZON
Lesson Objectives: Student will learn what space means when referring to art. They will also learn about the use of the horizon line.
Time Required: Day 1: 1 hour Day 2: a few minutes (can be combined with another lesson)
Artist: Wyland, Ocean Life Whaling Wall
Websites: http://www.hickerphoto.com/killer-whale-pictures-cat.htm
http://i219.photobucket.com/albums/cc249/seaserpentimages/SunsetOceanWallpaper.jpg
Materials (Session 1):
Scratch paper
Watercolor paper
Watercolor crayons
Paintbrushes
Dixie cups of water
Paper towels
Materials (Session 2):
Thin black Sharpies
Presentation:
Discuss the meaning of space in art: the illusion of a 3-dimensional object or objects created on a flat, 2-dimensional piece of paper. Overlapping, using different sizes (objects appear bigger the closer they are to you and smaller the farther away they are from you) color intensity (more intense color up close, lighter colors farther away), and detail (more detail up close and less father away) are some of the techniques artists accomplish this.
Procedure for Day 1:
- Practice drawing a whale on scratch paper along with you on the white board.
- Hand out watercolor paper and have them write their names on the backs of it.
- Have them draw a killer whale lightly with a pencil in the middle of their page, making sure they don’t draw it too small.
- Have them draw the horizon line across the page with the whale overlapping the horizon line.
- Place a sun on top of the horizon and ripples for the water underneath.
- Where the whale is jumping out have them draw in some splashes of water.
- They can add land in the distance or leave it alone.
- With their watercolor crayons, have them fill in the colors making sure they press hard in the foreground and pressing lighter in the background.
- The whole page should be covered before you hand out the brushes and water.
Procedure for Day 2:
- Have the kids outline them with thin black sharpies.

