LESSON PRESENTATION INSTRUCTIONS
VALUE
WATERCOLOR LEAVES
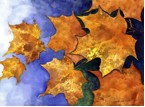
Lesson Objectives: Students will use different watercolor techniques to make a leaf design.
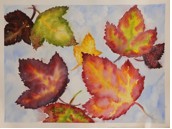
Artist: Laura Tasheiko, Fall Leaves #22 (available online)
Time Required: 1 hour
Materials:
Watercolor paper taped to cardboard
Pencils
Paintbrushes: thin and regular
1-2 leaves
Watercolors
Watercolor pencils
Water and cups
Paper towels
Tissue
Presentation:
Talk about the shape of leaves and their structure: veins, stems. Talk about the different colors and their value changes, the way one color transitions into another. Discuss overlapping.
Procedure:
- Pass out watercolor paper. Write names on blue tape.
- Take a leaf and arrange it in the corner of the paper. Trace it with a tin sketchy line.
- Remove the leaf and re-position it, slightly overlapping the 1st leaf. Keep doing this until you have 6-8 leaves on the paper.
- With the regular-sized brush and lots of water, select a color and start painting in the background. Keep the paper inside the leaves dry.
- Fill in each sketched outline with pencil lines representing the veins.
- With the watercolor pencils, color the veins and the color patches on the leaf.
- Fill in all the leaves.
- With clear water, paint over each leaf to blend the watercolor pencils.
- Sprinkle salt over the painting while still wet.


