LESSON PRESENTATION INSTRUCTIONS
FORM
UP, UP, AND AWAY
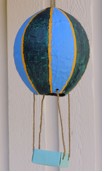
Lesson Objectives: The kids will be making a hot air balloon while learning about form, pattern and color.
Time Required: 2 sessions
Artist: Louise Nevelson, Case with 5 Balusters
Website: http://www.art.com/asp/display-asp/_/id–6309/Hot_Air_Balloons.htm
http://www.planetpals.com/papermache.html
Materials for Day 1:
Paper Mache glue in a bucket for each table group (See Recipes Below)
Paper bowls to hold the balloons in place
Blown up balloons
Newspaper torn into strips
Spray primer (optional)
Materials for Day 2:
Paint
Paintbrushes
Paper plates or cups to hold paint
Presentation:
Discuss form. How would you describe the hot air balloons? 3-dimensional? Colorful? Do you see patterns? Demonstrate the Paper Mache process.
Procedure, Session 1:
- Cover tables with paper. Pass out a bowl with the child’s name on it with a balloon on top of it to each child. In the middle of the table groups place a bucket or tub of Paper Mache glue.
- Hand out newspaper strips.
- Using long strips, dip the newspaper into the glue.
- Using their fingers like scissors, place the dipped piece of newspaper between them and pull towards you. This will wring out the excess glue. Staring at the top of the balloon, wrap the strips all the way around the balloon, overlapping the strips so the balloon doesn’t show through at all. Keep going until you get to the bowl.
- Make sure that the balloon is covered completely. Let dry.
A Couple of Days Later:
- Pop the balloons inside the paper mache with a pin.
- Write the kids names on the inside.
- Optional: Spray paint them with primer. (Then kids will then paint on a white surface, resulting in a truer color than if painted straight on the newspaper.)
Procedure, Session 2:
- Cover tables with paper. Place the kid’s balloon on top of a water bottle so it doesn’t rest on the table.
- Show the students the balloon pictures again. Have them decided what kind of colors/patterns that they want to do.
- Have the kids paint them and put up high to dry again.
- Punch four holes around the bottom of the paper mache balloon. Put yarn through the holes. You can make origami boxes or save apple sauce cups and put holes through those and tie together.
- To hang, put a small hole on top. Put fishing wire through the hole and tie a knot inside the balloon. Tie the other end of the wire to a stick.
Paper Mache Glue Recipes:
http://www.planetpals.com/papermache.html
Recipe 1: Ingredients: Flour, water, paper
- Stir three parts water into one part flour until the mixture is smooth and creamy.
- To make the paste last longer, add a few drops of oil of Wintergreen. (optional) You can buy this oil at a drugstore.
- Stir well and the paste is ready to use.
- Now you need paper- newspaper works well!
- Dip each piece of paper in the liquid mixture and apply it one piece at a time to form your shapes.
Recipe 3: Ingredients: Glue, water, paper
- Mix two parts white glue with one part warm water.
- Stir well and the Paste is ready to use.
- Now you need paper-newspaper works well!
- Dip each piece of paper in the liquid mixture and apply it one piece at a time to form your shapes.

