LESSON PRESENTATION INSTRUCTIONS
TEXTURE
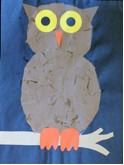
TORN PAPER OWLS
Lesson Objectives: Students will learn about texture using torn pieces of paper.
Time Required: 1 hour
Artist: Andre Derain, Henri Matisse, Portrait by Andre Derain
Source: http://afaithfulattempt.blogspot.com/2011/01/torn-paper-owls.html
Materials:
Black or blue construction paper 9×12
White crayons
Elmers glue
Q-tips
Brown paper (can vary this: use different colors for a blend) for owl body and ears
Yellow or orange circles for eyes
Black circles for pupils
Orange triangles for beaks and feet
Brown paper for branches (Templates available in the Kindergarten Sample book)
Presentation:
Discuss texture. Show how to tear paper.
Procedure:
- Demonstrate how to draw an owl. Using a white crayon, draw a large oval in center of page for the body and a circle on top for the head.
- Tear small pieces of paper and glue them down inside the oval and circle for the owl feathers, making sure none of the background paper shows through! It’s easier (and less messy) to tear a bunch of pieces of paper first, and then glue them all down.
- If the pieces are too small, they won’t be able to finish in an hour. If the pieces are too big, it won’t look as good.
- Fill in entire oval and circle, covering the crayon line.
- Glue on branch beneath but touching the owl’s body. Glue on feet.
- Glue on eyes, ears, and beak.
- This technique can be applied to other subjects as well, such as a penguin or a snowman, or anything with very simple shapes.

