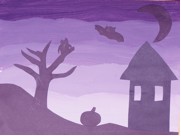
LESSON PATTERN INSTRUCTIONS
VALUE
SILHOUETTES ON VALUE: OPTION 2
FALL NIGHT SKY
Lesson Objectives: To learn how to create different values of the same hue.
Time Required: 2 sessions, First session 45 minutes, Second session 20 minutes
Artist: Arthur Dove, Foghorn
Materials (Day 1):
- White construction paper 9×12 or poster board
- Tempera paint: purple or blue, black and white
- Paper plates or white plastic bowls for mixing
- Paintbrushes
- Scissors
- Black paper
- Fall/ Halloween stencils, shapes or cookie cutters
Materials (Day 2):
Glue stick
Black Sharpies
Presentation:
1. Discuss the artist and also the Print; point out the different shades and values of the print.
2. Define value and explain how we can create an infinite amount of values to any hue by adding black (shading) or white (tinting).
3. Demonstrate how to mix the paint to tint a color by creating a value scale.
Procedure, Session 1:
- Hand out white paper and paintbrushes. Have the children write their names on the back.
- You can use Purple night skies or Blue or have the children choose. Give them a plate/plastic cup with their chosen color on one side, the same amount of white on the other and a small dot of black on another side.
- First mix the dot of black with the chosen color. Mix it until all the swirls are gone, this will create a darker sky color.
- Start with the dark value and paint a thick line at the top of the paper.
- Mix a good amount of white to your color, mix it until all the swirls are gone and paint another thick line connected to the line already on the paper.
- Mix more white to create a lighter value, mix until swirls are gone and paint another think line connected to the line already.
- Continue mixing and painting, add the same amount of white each time, until page is full.
- Set aside and dry (after dried you may need to put under heavy books to keep from curling)
- While drying discuss silhouettes. Using stencils or cookie cutters, have the children trace with a pencil trees, moons, houses with a square and triangles, owls, a long rolling hill the size of the paper to paste on the bottom, and pumpkins all out of the black paper.
- Have the children cut out the items and put aside until next session
Procedure, Session 2:
1. If needed, have the children finish cutting out the pictures out of the black paper.
2. Glue them on the painted paper (hint: for trees and windows you may want them to use sharpie to draw in the trunks, or panes in the windows)


