LESSON PRESENTATION INSTRUCTIONS
PATTERN
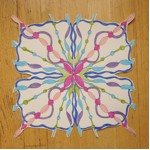
RADIAL SYMMETRY IN DESIGN: OPTION 1
Lesson Objectives: Students will learn about pattern and radial symmetry.
Time Required: 1 hour
Artist: Chuck Thurston, Radial Symmetry #3 (Scroll down on website for Radial Symmetry # 1, 2, 3 & 4)
Website: http://www.thurstondesign.us/ct-art.html
Materials:
12×12 white sulfite drawing paper (or any sturdy paper that is translucent enough to trace through)
6×6 white sulfite drawing paper
Pencil
Paper clips
Fine black Sharpie
Watercolor markers, colored pencils, or watercolor paints
Black construction paper
Scissors
Glue sticks
Presentation:
Discuss pattern. Explain radial symmetry: repeating patterns converge to a center point.
Procedure:
- With pencil, mark the upper left corner of the 12×12 paper with an “A” and the upper right with a “B”. Turn the paper upside down and repeat.
- On the 6×6 paper, put an “A” on the upper left corner. Behind the “A” on the back side of the paper, write a “B”.
- Create a design on the 6×6 paper that originates in the bottom right corner, diagonally opposite from the “A”.
- Turn the paper over and trace over it with pencil or a black pen.
- Line up the “A”s on both papers with the 6×6 behind the 12×12. Paper clip together and trace over the design with black Sharpie.
- Flip the 6×6 paper over so you see the “B” and line up the “B”s. Trace with black Sharpie.
- Do the same with the bottom ½ of the 12×12 paper.
- Color the design.
- Cut out the design and glue to black construction paper.


