LESSON PRESENTATION INSTRUCTIONS
PATTERN
QUILT BLOCK
Lesson Objectives: Students will combine different shapes in a repeated pattern to make a quilt block.
Time Required: 1 hour
Artist: Annie Bell Glenn Brooks, Economy Patch, Amish Quilt, Double Nine Patch
Bring quilts from home to show
Websites: http://www.womenfolk.com/quilt_pattern_history/
http://www.womenfolk.com/quilting_history/amish.htm
Materials:
Construction paper 12×12
Pre-cut squares
Scissors
Glue sticks
Quilt pattern ( see below)
Presentation:
Discus quilts and their history. Discuss how different quilt patterns are put together. Are the patterns horizontal, vertical, or diagonal? Are the patterns made up of shapes or colors?
Procedure:
- BEFORE CLASS: Select a quilt pattern for the class to follow. Divide the 12×12 construction paper into number of squares needed with a pencil.
- Write names on back.
- Have students glue on the paper pieces in the pattern selected.
- Make sure they are following the pattern.
- You may add additional patterns to the squares with markers or crayons if desired.
- Display them all together to look like a quilt.
Quilt Patterns (or any other one you might like):
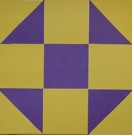
- Shoo Fly (pictured above):
a) Six 4×4 squares of one color (students will cut 2 in ½ along the diagonal for the triangles)
b) Three 4×4 squares of a different color (students will cut 2 squares in ½ for the triangles)
c) Students can add patterns to the squares too.
- Log Cabin
a) Eight 6×1 inch strips of a dark color
b) Eight 5×1 inch strips of a light color
c) Eight 4×1 strips of a dark color
d) Eight 3×1 strips of a light color
e) Four 2×2 squares of white or a light color


