LESSON PRESENTATION INSTRUCTIONS
SPACE
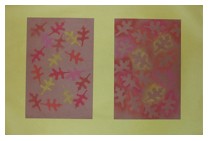
POSITIVE AND NEGATIVE DIPTYCH: OPTION 2
Lesson Objectives: Students will create a diptych using a stencil to make positive and negative shapes.
Time Required: 1 hour
Artist: Rene Magritte, The Surprise Answer
Materials:
9×12 construction paper
12×18 construction paper for mounting
Chalk pastels
Stencils (smaller are better)
Wet Ones
Presentation:
Discuss and define space, shape and symmetry. Show positive and negative space in the print. Define diptych.
Procedure:
- One sheet will be for positive shapes: Hold stencil firmly in place. Color inside stencil. Use your finger to spread color to the edge of the stencil to create sharp outlines before removing the stencil.
- One sheet will be for negative shapes: Hold stencil firmly in place. Color pastel over the edge of the stencil and onto the page around the entire shape without moving the stencil. Run your finger over the chalk to blend and create a sharp-edged outline.
- Work from light to dark colors or clean fingers in between colors.
- Mount on a piece of 12×18 paper.

