LESSON PRESENTATION INSTRUCTIONS
FORM
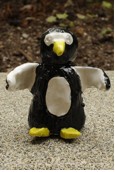
PENGUINS
Lesson Objectives: Students will learn about form while hand sculpting a penguin.
Time Required: Two sessions, 1 hour each
Artist: Auguste Rodin, The Thinker
Materials (Day 1):
Clay
Brown paper bag or cardboard placemats
Small cups or lids of water
Clay tools
Materials (Day 2):
Glazes: black, white, and yellow
Paintbrushes
Dixie cups
Presentation:
Discuss form and scoring technique.
Procedure, Session 1:
- Form a ball of clay into an oval shape for the penguin’s body. With your thumb, push a hole from the bottom of the oval inside to create a hollow space. (If this is not done, the ball of clay will be too thick. It will not be able to dry completely and will explode in the kiln.)
- Flatten the clay oval with the hole on the bottom on the desk so it sits without wobbling,
- Using your thumbs, make indentations for 2 feet on the bottom.
- Roll a small ball of clay for the head and attach to the top of the oval using the scoring technique.
- Add a beak with the scoring technique.
- With additional pieces of clay, shape 2 wings and attach to the body using the scoring technique.
- Score an oval for the belly and poke small holes for the eyes.
- Carve initials on the bottom.
- Let dry 14 days and bisque fire in kiln.
Procedure, Session 2:
- Remind the students that glaze should only go where the eye can see without lifting the piece. While painting, rotate the piece by turning the placemat.
- Don’t get glaze on the bottom! Or use stilts in the kiln to prevent glaze from coming into contact with the kiln shelves.
- Use 2-3 coats for vibrant colors.
- Let dry overnight and glaze fire in kiln.

