LESSON PRESENTATION INSTRUCTIONS
PATTERN
PATTERN NAME DRAWING
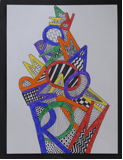
Lesson Objectives: Students will create a drawing using the letters in their first name and patterns.
Time Required: 1 hour
Source: http://deepspacesparkle.blogspot.com/2009/07/line-drawing-part-iii-name-designs.html
Note: This is a great review lesson, for it covers line, pattern, shape, space, color, and texture.
Artist: Charles Searles, Dancer Series
Materials:
White paper 9×12
Pencils
Black Sharpies
Markers
Presentation:
Discuss what different kind of lines and patterns there are: thick, thin, long, short, curvy, twirly, intersecting (tic-tac-toe), zig zag, wavy, etc.
Procedure:
- Pass out white paper and pencils. Make sure paper is placed vertically.
- Write names on back.
- Starting on the bottom of the page with the first letter in their name, make a “bubble letter” outline. (line, shape) It will become a base of a tall tower of letters.
- Move on to the next letter. You can angle the letters, place them sideways, or even upside down.
- Show students how you can make the letters overlap. (space)
- You do not have to go in order of the letters and you can use each letter more than once.
- As you get closer to the top, the letters will become smaller. (space)
- Once the tower of letters is complete, outline the letters with a black Sharpie.
- Fill in the spaces between the letters with different patterns using a black Sharpie. (line, pattern, texture)
- Color in the letters with a variety of colors. (color)
- Mount on colored paper and return to students.


