LESSON PRESENTATION INSTRUCTIONS
PAPER WEAVING
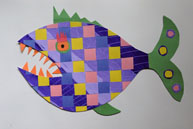
PAPER WEAVING FISH
Lesson Objectives: Students will learn about weaving with paper.
Time Required: 1 hour
Artist: Daisy Taugelchee, Navajo Rug Weaver http://www.navajotimes.com/entertainment/culture/2011/011311daisy.php
Source: Deep Space Sparkle
Website: http://www.deepspacesparkle.com/2013/03/28/paper-weavings/
Materials:
Colored construction paper cut into 1 inch strips
White 12×18 construction paper (see Notes below)
Ruler
Crayons, markers, or oil pastels
Scissors
Glue
White copy paper
Scraps of colored construction paper
Presentation:
Discuss the history of weaving, specifically rug weaving.
Procedure:
- Pass out the white 12 x 18 white construction paper and lay it vertically. Fold one ½ over the top of the other, like a book, and arrange the folded piece of paper so that the fold is at the bottom (towards you).
- Using a ruler, draw a line about an inch to an inch and a half horizontally across the top of the paper.
- Using a ruler, divide the paper into 1 inch strips vertically from the bottom of the paper to the line: not all the way to the top! (See diagram in binder.)
- Cut along the vertical lines to create strips, stopping at the top line!
- Open the paper and turn it horizontally. You should have 1 inch strips cut across horizontally with a solid 1 inch border on each side that is not cut through.
- Color each strip with crayons, markers, or oil pastels. Each strip can be a different color/pattern, or they can be variations on a similar theme. The student’s imagination is the limit!
- Select 2 different colors of the 1 inch paper strips. Using one, show the students how to weave using the over/under technique and sliding the paper to one edge of the paper. Using the second colored strip, reverse the over/under pattern to create the weave.
- Alternate the colored strips until the decorated paper is completely woven with paper strips.
- Turn the woven paper over and glue on a piece of white copy paper to the back to help anchor the strips in place.
- Draw an outline of a fish, using as much of the paper as you can for a good sized fish.
- Cut out the fish and turn it over so you can see the woven side. Using scraps of colored construction paper, cut out details to add to the fish: a tail, teeth, fins, an eye, etc. Glue on.
NOTE: An alternative to decorating the 12×18 white construction paper with crayons is to paint it with tempera paint, adding designs with texture tools (check the Texture bin in the EA room). This is a quick step, but it must dry, so perhaps sneak it in at the end of an art lesson prior to beginning this lesson.

