LESSON PRESENTATION INSTRUCTIONS
SHAPE
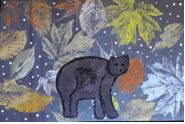
OLD BEAR LEAF PRINTMAKING
Lesson Objectives: Students will learn about printmaking using leaf prints.
Time Required: 1 hour
Artist: Kevin Henkes, Old Bear (book)
Source: http://www.deepspacesparkle.com/2009/09/old-bear-leaf-print-and-bear-painting/
Materials:
Black paper 12×18
White paper 9×12
Brown, black, white, yellow, gold, orange tempera paints
Paintbrushes
Leaves
Q-tips
Drying rack
Presentation:
Read Kevin Henkes’ Old Bear. Show how he used simple black lines to denote fur and simple shapes to draw the bear. Discuss printmaking technique.
Procedure:
- Pass out white paper. Using pencil, have students draw a bear. You can use a guided drawing lesson. Make sure bear is BIG…fits the size of the paper!
- Paint the bear brown.
- Using a small brush with black paint, add the details: fur, eyes, nose, claws, etc.
- Place in drying rack to dry.
- Pass out black paper, leaves, and white, orange, yellow, and gold paints. Demonstrate how to paint leaf with veins-side-up with a paintbrush, then flip over and press firmly onto the black paper, trying not to slip or move the leaf. Place a scratch paper over the leaf and press down firmly. Peel off the leaf carefully to reveal the leaf print. Too much paint will leave an indistinct blob.
- Continue adding leaf prints in different colors and with different shaped leaves to fill black paper. It’s nice to have some leaves go off the paper. Don’t worry if the paint colors mix on the leaves. The blending of colors will nicely mimic fall foliage.
- Using a Q-tip or the back end of a paintbrush, add “snow” in between the leaf prints.
- Place in drying rack to dry.
- After everything is dry, cut out the bear and glue it on to the background.

