LESSON PRESENTATION INSTRUCTIONS
COLOR
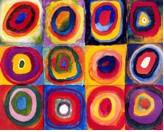
KANDINSKY CIRCLES
Lesson Objectives: To introduce the children to the color wheel, including warm and cool colors, complimentary colors and monochromatic tones.
Time Required: 1 hour
Artist: Wassily Kandinsky, Squares with Concentric Circles, 1913 (available online) Materials:
- Watercolor Paper
- Watercolors
- Watercolor Brushes
- Oil Pastels
- Black Paper for Mounting
Presentation:
Discuss the color wheel:
Warm and Cool Colors
Complimentary Colors
Monochromatic Color schemes
Procedure:
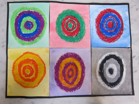
1. Precut 9×12 watercolor paper into 6 equal sections (4×4.5)
2. Have students create concentric circles using oil pastels in each of the square sections of watercolor paper. Do the following color combinations for each square:
– One Warm
– One Cool
– Two Complimentary
– One Monochromatic
– One whatever colors they choose
3. For each square, using a color from the circles they have drawn, paint the background of the square with watercolors. For example, if it is the warm square, use a warm color for the background. If it is a cool color, use a cool color. If Complimentary, use one of the complimentary colors colored in the circle. It is ok to paint over the oil pastels, as they will resist the watercolor paint.
4. Once dry, mount all six squares on a black sheet of paper. They will have to be pressed flat using heavy books.


