LESSON PRESENTATION INSTRUCTIONS
SPACE
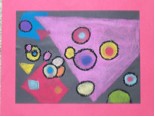
KANDINSKY BUBBLES
Lesson Objectives: Students will learn how using such tools as overlapping, size and perspective can make a flat (2-dimensional) image look like it has form (3-dimensional). Floating bubbles determine the initial composition of this abstract art. Students will use chalk pastels to color and add shapes to create balance while learning about positive and negative space.
Time Required: 1 hour
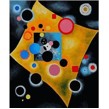
Artist: Wassily Kandinsky, Accent en Rose (available online) 
Materials:
Bubbles and Blowers
Elmer’s glue
9”x12” Black construction paper
cut 12”x15” Asst. bright color paper
Black glitter
White chalk
Chalk Pastels
Glue sticks
Presentation:
Discuss the concept of space in art: making a 3-dimensional object appear 3D on a 2-dimensional piece of paper. Discuss techniques artists use to achieve this, such as overlapping, size, and perspective. Discuss positive and negative space. Show how Kandinsky creates space in his painting. Do a demo with the bubbles, outlining the rings and show them what to do when they overlap
Procedure:
- Pass out the black paper. Write names on the back.
- Walk around to the groups and blow bubbles over the black paper. Students are instructed to trace the outline of the bubble (with white) immediately after it pops and makes a ring on their paper. Stop blowing bubbles once each student has about 6 or more. Because the bubbles determine the composition, the papers may not be balanced.
- Show the students how to use pastels and how to blend. Students then color in the circles (positive space) and then add shapes behind the circles (negative space). Remind them how the colors they use and the size and placement of the background shapes will balance their artwork.
- After class: To “finish” the artwork and prepare it for display, an adult outlines all the bubbles with glue and adds black glitter. Pick a bright background paper for a border that makes the artwork “pop”. Remember to record their names before gluing.

