Understanding the element of shape and exploring abstract art
Lesson Objectives: Students will learn about the element of line, and create art in the style of Jen Aranyi
Time Required: 1 session
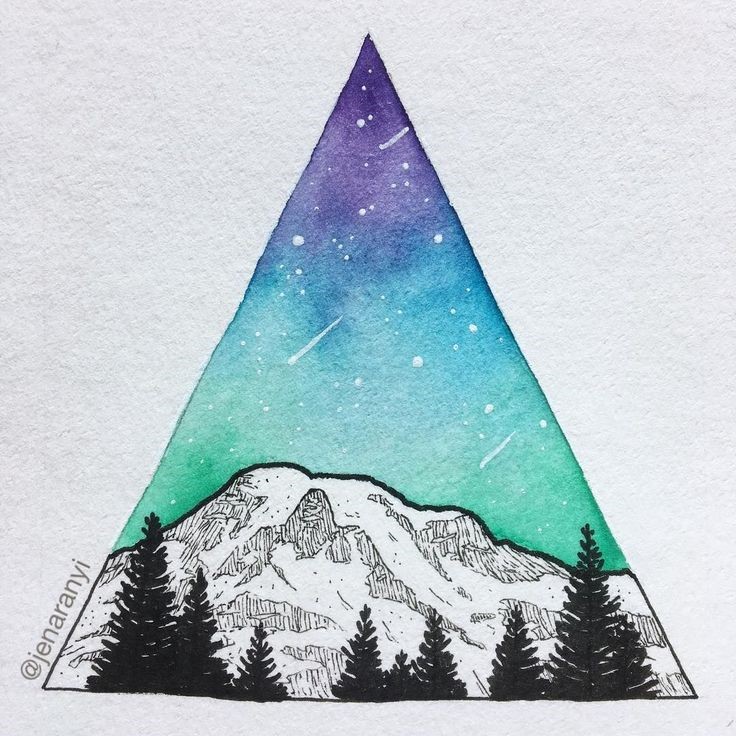
Artist: Jen Aranyi, mixed media landscapes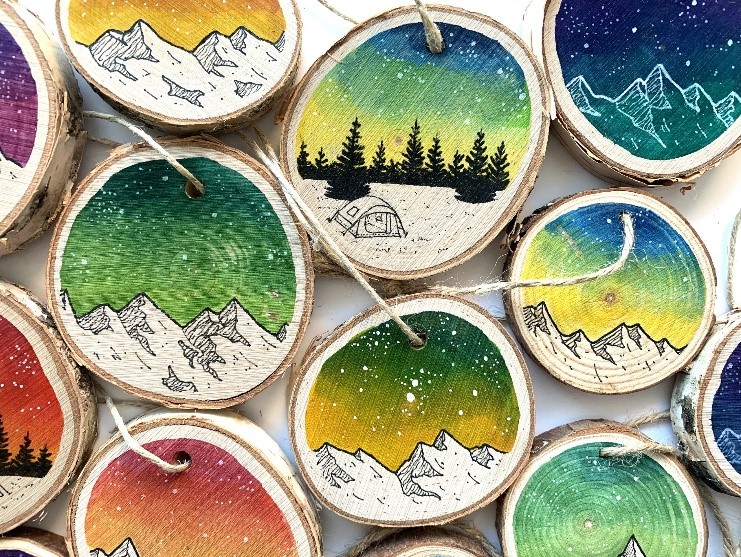
Jen Aranyi makes small artworks. Instead of one big triangle as outlined in the project description below, consider having each student make two or three small ones, especially if someone else has already left a bunch ready cut triangles for you in the supply room.
Materials:
9×12 white heavyweight construction paper cut into 9” triangles.
(Smaller triangles made from the offcuts, roughly 4” – optional)
Crayola markers, (broad tipped and water based)
Fine tip (normal) Sharpies
Ultra Fine tip Sharpies
Mixed media paintbrush (NOT the watercolour brushes)
Small water cups.
Toothbrush
A small flat bowl or paint cup with diluted white acrylic paint, or white liquid tempera
Messy mats to protect their desks
12×18 black heavyweight construction paper cut into 12” triangles
(Smaller triangles made from the offcuts, roughly 6” – optional)
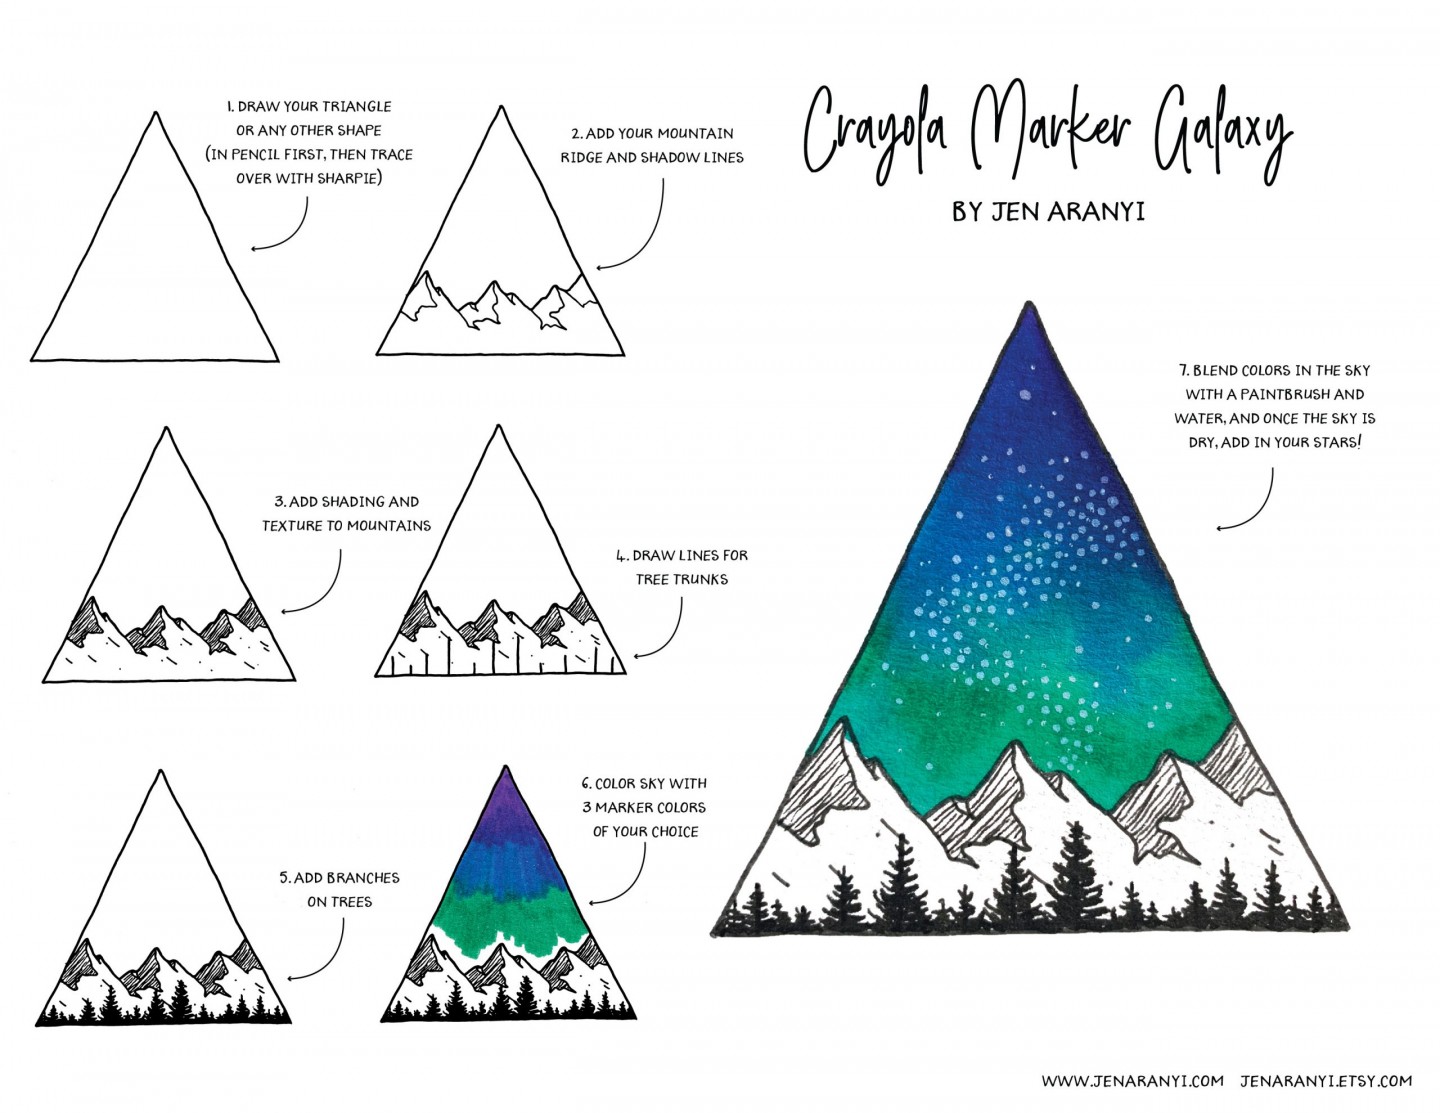
Presentation: Tell the class about the element of line, and a little about contemporary artist Jen Aranyi. Show an example of her work and point out how she uses line to create values in her mountains. Also take a moment to explain the difference between the waterbased markers and the sharpies, that the waterbased markers will bleed if you add water to them, whereas the sharpie will stay intact. (About Jen – Jen Aranyi)
Procedure:
- Hand out a paper triangle, a fine tip sharpie, and an ultra-fine tip sharpie to each student.
- Have students draw lightly with pencil, a jagged zig zag mountain line about a third of the way up from the bottom of the triangle. It should go all the way from edge to edge, this is why we have messy mats to protect the desks.
- Have students trace their mountain range with the fine point (thicker) sharpie.
- Add in the shape of the shadows on one side of the mountain range. The shadow is always on the same side of each peak and comes down from the tip and then goes at an angle to meet the downward V next to it. (See visual lesson plan above.)
- Use the ultra-fine tip sharpie to add in hatching to create a darker value in the shadow area.
- With the ultra-fine tip Sharpie, also add some texture to the mountain side.
- With either sharpie, draw vertical lines for tree trunks
- Add branches on trees, show examples on the white board. Trees can be as simple as a series of horizontal lines that go from very narrow at the top to wider at the bottom, or more detailed like in the artist’s example. If students are struggling, even a tall narrow triangle with wobbly sides will look good as a tree.
- Have students add a signature on their paper and return the sharpies.
- Hand out markers. Tell students to pick two to three warm colours or two to three cool colours. Tell them this helps avoid creating a brown sky.
- Have students colour the sky, putting the darkest colour near the top, and ideally leaving a little bit of white close to the mountains.
- Students can now exchange their markers for a cup with a little bit of water and a medium sized paint brush. Remind students that this is not watercolour paper, so they need to use only a little water.
- Students use the wet paintbrush to blend the colours in the sky and pull the colour down the last bit towards the mountain. Be careful to not get paint inside your mountains.
- Have one or more star splattering stations depending on how many helpers you have; this needs to be supervised.
- While students are working, prepare the star splatter stations: start with about a pea sized gob of white paint in a small shallow bowl and add a very small amount of water to it. You want the consistency of chocolate milk. Cover area with messy mats. Keep one toothbrush for yourself/the helper manning the station and one toothbrush for students to use. (Two toothbrushes per station).
- Show students how to spatter stars with a toothbrush dipped in white paint A little goes a long way. You can show spattering onto a messy mat, or onto a coloured piece of paper. Drag your thumb from the tip of the toothbrush towards the handle. As the bristles are released they will flick paint drops forward.
- If artwork is visibly wet, dab it with a paper towel. Stars will disappear if they land in a puddle of water. Damp paper is ok.
- Let students try spattering, model how you are holding your own toothbrush, and if needed help them direct the spray by repositioning the back end of the toothbrush for them. Keep an eye on their spattering thumb, if they flick bristles the wrong way, they may spatter themselves instead of the artwork.
- Lay out to dry. If using drying racks, you will need to line the “shelves” with messy mats or scratch paper as the triangles are too small and don’t lie well over the openings. They do dry quickly though, so easiest is to just leave them lying flat until they do.
- If using construction paper, the artwork will warp when drying, but you’ll fix that!
- Once dry, mount on the black triangles, using double sided tape, or glue stick. Avoid the quick drying glue sticks to save yourself some trouble. One end tends to dry before you have finished putting glue on the whole thing. Elmer’s seems to work better. Place mounted artwork under some large heavy books overnight or longer.
Optional, if you cut the offcuts into smaller triangles offer these to students who finish quickly to make another one or offer students to take them home and make additional artwork. Any waterproof pen, even a waterproof ballpoint pen can replace the sharpie, and stars can be drawn with a white gel pen or white coloured pencil instead of spattering paint.
Cleanup
- Paintbrushes need to be cleaned! Students only painted with water, but the paintbrush picked up colour from the markers and need to be washed just as if they used paint.
- To clean up acrylic paint wipe off the toothbrushes and wipe out your bowl with (the used) paper towels. Acrylic paint does NOT go down the drain if we can avoid it.
- Now clean the very last of the paint off the toothbrushes in the sink.
- Those smaller triangles that are left over can be left in the supply room, don’t recycle them please.

