LESSON PRESENTATION INSTRUCTIONS
PATTERN
IRIS FOLDING
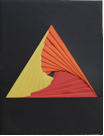
Lesson Objectives: Students will create a pattern in the shape of a triangle or square using folded strips of paper.
Artist: Richard Fuller, Buckminster
Time Required: 1 hour
Source: http://thatartistwoman.blogspot.com/2009/09/iris-folding-art-projects.html
Materials:
Black tagboard
Various colors of paper (red, orange, yellow, green, blue, purple), cut into 1 ½ inch strips
Scotch tape
Markers in the same colors as the paper
Iris folding template
Presentation:
Discuss what a pattern is (a repeating element).
Preparation:
- Before the lesson, cut out a triangle or square shape from the center of a black piece of 8 ½ x 11 tag board for each student.
- Make copies of the templates and tape them on the back side of the paper so that the template shows through the cut-out shape.
Procedure:
- Pass out the prepared templates. Have students choose their colors: 3 for the triangle, 4 for the square.
- Show students the pattern on the template. Using markers the same color as the paper colors they’ve chosen, mark the pattern.
- Have students fold a strip of paper lengthwise the same color as the dot in area #1.
- Starting at area #1, place the 1st strip of paper down making sure that the folded edge is toward the center of the template.
- Tape the strip down on the black paper, and trim as necessary.
- As you continue, the strips needed will become shorter and shorter, so save your scraps.
- Once completed, it will look like a big mess of paper and tape because you are working from the back of the project.
- Turn over and remove the template and prepare to be wowed!


