LESSON PRESENTATION INSTRUCTIONS
TEXTURE
GREAT HORNED OWL
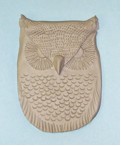
Lesson Objectives: Students will create a wall hanging of a great horned owl with clay.
Students experience the difference between implied and actual texture by adding texture to a basic slab of clay to transform a flat plane into a dimensional piece.
Artist: Felip Archuleta, Porcupine
Time Required: Two sessions, 1 hour each
Materials (Day 1):
Clay
Brown paper bag or cardboard placemats
Rolling pins
Small dish or lid of water
Tools to create patterns
Straws
Materials (Day 2):
Glaze
Paintbrushes
Dixie cups
Presentation:
Discuss great horned owls, showing pictures if possible. Point out the pattern of his feathers and how it creates a textured look. Discuss texture and slab and scoring techniques.
Procedure, Session 1:
- Students will start by rolling a slab of clay and then cut out a rectangle shape with a peaked top.
- Folding the peak down, over a straw or pencil will create the V on the owls forehead and his ear tufts.
- Use clay tools to impress patterns to create a variety of textures for the forehead, surrounding areas of his eyes, and chest feathers
- Initial and date the back side. You will know the clay is not adhered to the straw or pencil if it can be rotated or wiggled back and forth. Leave it in there until the clay is completely dry and then remove.
- Let dry 14 days and bisque fire in the kiln.
Procedure, Session 2:
- Glaze the front sides of the owl.
- Use 2-3 coats for vibrant color.
- Don’t get glaze on the bottom! Or use stilts to prevent the glaze from coming into contact with the kiln shelves.
- Let dry overnight and glaze fire in the kiln.
- Send a string through the top to hang for display.

