LESSON PRESENTATION INSTRUCTIONS
FORM
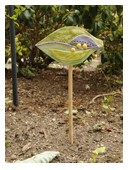
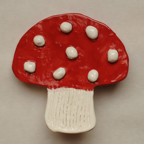
GARDEN STAKES
Lesson Objectives: Students will make a clay garden stake using the slab and scoring techniques.
Time Required: 2 sessions
Artist: Elizabeth Catlett, Tired
Materials:
- Clay
- Miscellaneous tools from clay cupboard
- Water cups
- 36” x 3/8” oak dowels from Home Depot, cut in half at home with a saw. (The oak dowels are best- they’re stronger and will last longer.) One dowel for each child once they’re cut in half, ex.: 12 dowels for 24 kids.
- Large cookie cutters if desired- simple shapes such as leaves, flowers, circles. We used a 4 ½ inch flower cookie cutter for those who wanted to use it, but created leaves and other shapes by hand.
- Scrap paper
Presentation:
Discuss form. Discuss slab and scoring techniques.
Procedure, Session 1:
- Cut clay block into pieces and run through clay press so you have one slab for each child.
- Suggest organic shapes such as a flower, a sun, leaves, animals- appropriate for use in a garden or plant pot. Have students draw out their design on scrap paper before they start cutting into clay. This helps keep them from cutting up their slabs before they’ve figured out what they want to do.
- Using clay tools, students cut out their shape from the slab, keeping the excess clay to create embellishments on their shape. Flowers can have leaves attached, a raised center area, or extra layers on petals. One student in our class made a turtle and created the legs, head and tail with extra clay and attached them with slip, then used her tools to make lines in the clay for the pattern on the back of the turtle’s shell. She balled up small bits of clay for eyes on the head and toes on the feet.
- VERY IMPORTANT TIP #1: Make sure that student use their tools to create hatch marks on both pieces of clay that are to be attached! If a student is attaching a leaf to a flower, create a longer leaf so that the extra area can be attached to the back of the flower itself. Make hatch marks on the leaf and on the back of the flower, then use water to create slip to ‘glue’ the pieces together. Since the back will show, smooth the surface with a wet finger so that it becomes flat.
- VERY IMPORTANT TIP #2: Smooth all edges with a wet finger. Any rough edges will still be there after firing, including lines drawn with a tool. Use a wet finger or a wet tool to smooth all edges, and don’t forget to smooth out the back as well.
- To apply the pocket on the back for the dowel:
- Make a flat piece of clay about 2”x 3” and form it around the dowel in the palm of your hand. Adult helpers should assist heavily with this part so the pockets fit the dowel and are securely attached to the back of the shape.
- Determine where the pocket will best fit on the back, keeping in mind how the student wants their creation to look on the stake. Make hatch marks on both the shape and around the inside of the pocket, keeping the dowel in place.
- Attach the pocket to the piece with slip, still keeping the dowel in the pocket so you can create the correct opening for the dowel. Carefully smooth out the pocket so it becomes flat against the student’s shape. Make sure the dowel can move slightly within the pocket- if it’s too tight, it won’t fit inside after firing (the clay shrinks a little when it’s drying).
- Remove the dowel and let the entire piece dry on a paper plate, propping up the shape with some balled paper to support the pocket on the back as it dries.
- Let dry 14 days and bisque fire in the kiln.
Procedure, Session 2:
- Allow students two or three colors for their pieces- a main color and a few colors for accent areas such as the center of a flower, the leaves, body parts, etc.
- Remind them to CAREFULLY paint the embellished areas so that the colors don’t overlap- this will show after firing.
- Students should apply three coats of each color for optimal saturation of color. (Leaf sample only has two coats.)
- The backs can be painted too- use the little tripod stands in the kiln when you fire so the pieces don’t stick to the shelves.
- Let dry overnight and glaze fire in the kiln.


