LESSON PRESENTATION INSTRUCTIONS
PHOTOGRAPHY
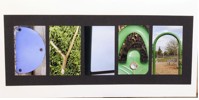
FIND YOUR NAME
Lesson Objectives: Students will learn about photography while finding the letters in their name in unusual places.
Time Required: 1 hour
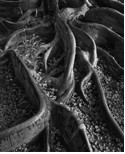
Artist: Ansel Adams, Roots, Foster Gardens, Honolulu
Website: http://www.atozillusions.com/
Materials:
Digital cameras: Available for checkout from Barb Regan, librarian.
Photography powerpoint
Presentation:
Discuss photography: focus, rule of thirds, framing, and being aware of what’s in the background.
Procedure:
- BEFORE CLASS: Make sure all cameras are charged and memory cards are empty. Overcast days are going to yield the best results.
- Instruct students in the proper use and care of the cameras.
- Break the students into groups of 3-4. Take a picture of the student going 1st and have them take all their pictures at that time. When it’s the next student’s turn, take a picture of that student, and then it’s their turn to take all their pictures. That way, when you’re at home going through the pictures on your computer, you will know exactly who took which pictures.
- Instruct students to look for the letters of their name in branches, playground equipment, fences, etc. outside and photograph each letter VERTICALLY! Some letters will be hard to find, so students may create their letter out of sticks, rocks, leaves or flower petals and photograph that. Upper or lower case letters are fine.
- Parents: Crop and print the letters of their name. Mount in a series on a black piece of construction paper.
- Erase memory cards and return cameras to Barb Regan.
Note:
Printing costs are not included in the EA budget.

