LESSON PRESENTATION INSTRUCTIONS
LINE
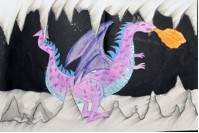
DRAGONS IN CAVES
Lesson Objectives: Students will learn about line while drawing a dragon.
Time Required: 2 sessions
Artist: Chris Achilleos, Dragonspell (available online)

Source: Dynamic Art Projects for Children, pgs 102-106
Materials (Day 1):
12×18 white construction paper, 2 per student
12×18 black construction paper
Pencil
Watercolor pencils
Paintbrushes
Paper towels
Photocopies of examples of dragons
Materials (Day 2):
Colored markers
Black Sharpies
Scissors
Elmer’s glue
Q-tips
Fine white glitter
Presentation:
Discuss space in art and how depth is created by overlapping. Show examples of dragons, caves, stalactites and stalagmites.
Procedure, Session 1:
- On one piece of 12×18 white paper, draw a dragon. (See information in the Binder.)
- Color the dragon with watercolor pencils and use a wet paintbrush to blend the color. Set aside to dry.
- On the 2nd piece of white paper, draw the cave: a series of jagged peaks and valleys along the top of the paper (stalactites) and the bottom (stalagmites).
- Color with dark watercolor pencils (blue, black, or purple), and add water on a paintbrush to smear it. (Carbon paper method in the book was not effective.)
Procedure, Session 2:
- Outline the dragon with black Sharpie and add details (scales, etc.) with colored markers.
- Cut out the dragon.
- Cut out the stalagmites and stalactites and arrange them and the dragon so that some are in front of and behind the dragon. Glue in place.
- Use a Q-tip to run a thin line of glue down one side of every stalagmite and stalactite and sprinkle with white glitter to look like ice.

