LESSON PRESENTATION INSTRUCTIONS
VALUE
COFFEE ART
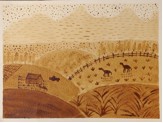
Lesson Objectives: Students will learn about value while creating a painting in the style of Van Gogh’s Harvest-The Plain of La Crau
Time Required: 1 hour
Artist: Vincent Van Gogh, Harvest-The Plain of La Crau, 1988
Materials:
Watercolor paper taped to cardboard
Water
Instant coffee (Safeway brand is fine)
Paintbrushes
¼ teaspoons or other small scoops
Sponges
Paper towels
Drying rack
Presentation:
Discuss value and Harvest-The Plain of La Crau. Show how Van Gogh, using only brown ink and its gradations, was able to create a dynamic and interesting landscape.
An alternate made easy version can be found here Coffee Art.
Procedure:
- Pass out watercolor paper. Using pencil lightly, have students divide landscape into 8 sections: sky, mountains, background, and 5 sloping hills in the foreground. (See diagram in binder.)
- Pass out shallow dishes filled with 1 tablespoon water in each for every student.
- Add a pinch of coffee to the water and stir to dissolve the granules. It will be very light in color and very watery.
- In order to prevent this watery mixture from running all over the page, it is important to BLOT heavily on the paper towel before bringing the brush to the paper. Beginning at the junction between the sky and the mountains, paint up towards the top of the paper. This will allow the junction between the 2 sections the most time to dry, thus preventing seepage between the sections.
- Now add ¼ tsp coffee to the water and stir to dissolve the granules. Blot heavily and then beginning at the junction between the mountains and the lower background, paint up to the sky, taking care not to paint into the sky.
- Add ½ tsp coffee to paint the background as above. (Section #3 on diagram.)
- Add ½ tsp coffee to paint the hill furthest in the background. (Hill #1 on diagram.)
- Add ½ tsp coffee to paint the next hill. (Hill #2 on diagram.)
- Add ½ tsp coffee to paint the third hill. Notice the coffee/water mixture is getting thicker with each addition, so it is easier to control. Use this mixture to also add in details in the mountains: lines, sponging, etc. (Hill #3 on diagram.)
- Add ½ tsp coffee to paint the 4th hill. Use this mixture to add the dots in the sky with the back, wooden end of the paintbrush. Add simple trees and a fence. (Hill #4 on diagram.)
- Add ¾ tsp coffee-the final addition. The mixture will be very thick now. Paint the final hill, the one closet to the foreground. You should have a nice gradation of value from the lightest in value at the top/sky, to the darkest value at the bottom/hill. Now you can add sponging on to one of the hills and other details like barns, horses, plants, etc. (see Handout in Sample book.)
- Let dry on drying rack.


