LESSON PRESENTATION INSTRUCTIONS
FORM
CLAY MASKS
Lesson Objectives: Students will create a clay mask by hand building with clay and using the scoring technique to add-on clay features.
Time Required: 2 sessions, 1 hour each
Artist: Bella Coola Mask, Representing the Sun, Africa, Kifewebe Face Mask,
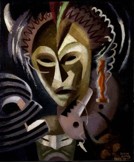
Lois Mailou Jones, Mask Les Fetiches (available online)
Materials, Session 1:
Clay
Paper bag or cardboard placemats
Small cups or lids of water
Rolling pins
Clay tools and/or toothpicks
Materials, Session 2:
Glaze
Paintbrushes
Dixie cups
Presentation:
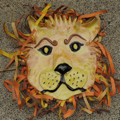
Discuss slab and scoring techniques. Discuss masks: there are 5 masks in Lois Mailou Jones’ painting. For this project, there are a lot of options. Students can make animal masks, masks of human faces, or a mask replicating their own face (bring mirrors).
Procedure, Session 1:
- Demonstrate how to make a slab using a rolling pin. Rotate direction of rolling pin to create an even slab. Occasionally lift and flip clay so it doesn’t stick to the paper.
- Students determine their shape and design of their mask. Lightly draw an impression of the outline of the base on the slab, and then cut away excess.
- Using the remainder of their clay, build features. Pieces must be joined well or they will fall off when the clay dries. Test by trying to pull the joined pieces off. Students may not draw impressions in the clay – all details should be made with clay.
- Sign the artwork on the back with a toothpick. Suggest initials and year.
- Let dry for 14 days. Bisque fire in the kiln.
Procedure, Session 2:
- Masks should be glazed with 2-3 coats of glaze.
- Don’t get glaze on the bottom! Or use stilts in the kiln so the glaze doesn’t come in contact with the kiln shelf.
- Let dry overnight and glaze fire in the kiln.


