LESSON PRESENTATION INSTRUCTIONS
FORM
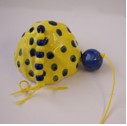
CLAY BELLS
Lesson Objectives: Students will create a pinch pot to make a bell. Students are introduced to the technique of pinch pots. Form is recognized when 3 dimensions are present (height, width, and depth).
Time Required: 2 sessions
Artist: Richard Zane Smith, Storage Jar, Dorothy Torivio, Ceramic Vessel
Materials (Day 1):
Clay
Paper bag or cardboard placemats
Water
Wooden dowels
Materials (Day 2):
Glaze
Paintbrushes
Dixie cups
Wooden dowels
String and beads (optional)
Presentation:
Discuss form: includes all 3 dimensions (height, width, and depth). Discuss the pinch pot technique.
Procedure, Session 1:
- Dispense a ball of clay to each child.
- Make the clapper for the bell: Have the child break off a small piece of clay. Roll into a smooth ball, and poke a hole through the center all the way to the other end with a wooden dowel. Make sure there is a clean hole large enough to thread string through. Carve initials into ball.
- Make the bell: With a large ball of clay, have students make a pinch pot. Depress thumbs into the center of the ball, pinching and turning the ball of clay to make even walls no more than ¾ in thick and no less than ¼ inch thick.
- Smooth cracks with a wet fingertip.
- Place the pot upside down on the placement, like a bell. Poke a hole through the top of the bell with a wooden dowel. Make sure there is a clean hole large enough to thread string through.
- Carve initials on inside of bell.
- You may pack wads of newspaper into hollow portion of the bells to hold their shape.
- Let dry for 14 days, remove newspaper, and bisque fire in the kiln.
Procedure, Session 2:
- After fired, paint with glaze.
- Use 2-3 coats for vibrant colors.
- Don’t paint the bottom of the bells! Or use stilts to keep glaze from coming into contact with the kiln shelves.
- Paint entire small ball (clapper). You WILL need to stilt these in the kiln!
- Re-insert wooden dowel through holes in bells and clappers to make sure they aren’t glazed shut.
- Let dry overnight and glaze fire in the kiln.
To String the Bells (Parents):
- Cut a piece of string. Tie a knot about 4 inches from one end of the string and thread through the inside of the bell, so that the knot is on the inside of the bell.
- Tie a knot on the top of the bell at the opening of the hole.
- With the remaining string coming from the inside of the bell, slide the clapper ball on the string, measuring to ensure it will hit the inside of the bell when it is rung. Tie a knot to the desired length.
- On the top of the bell, students may slide on some beads (optional) before tying a loop in the string to hang the bell.

