LESSON PATTERN INSTRUCTIONS
SPACE
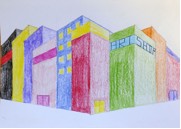
CITY CORNER
Lesson Objectives: Students will learn about 2-point perspective.
Time Required: 1 session
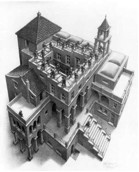
Artist: M.C. Escher, Ascending and Descending
Website: http://www.coolschool.k12.or.us/courses/116200/lessons/11/index.php
Materials:
White 9×12 construction paper
12×18 construction paper
Blue painter’s tape
Colored pencils
Rulers
Presentation: Discuss 2-point perspective and how Escher uses it in his paintings.
Procedure:
- BEFORE CLASS: Tape 9×12 paper in the middle of a 12×18 piece of paper: 1 per student.
- Pass out papers; write names on back.
- In pencil, draw a horizon line about 1/3 from the bottom of the page. Extend the horizon line beyond the edges of the 9×12 paper about 1 to 1 ½ inches onto the 12×18 paper.
- Draw a dot on each end of the horizon line. These are the 2 points to which every horizontal line will be drawn.
- Using the ruler, draw a light vertical line down the center of the 9×12 piece of paper. On this line, draw a dot below the horizon line and one about 1/3 from the top of the page.
- Connect the top and bottom dots to the 2 points. This will be the foundation on which the city corner is built.
- Draw a vertical line on either side of the center vertical line to create the corner building.
- Now add in other buildings in this fashion:
- Vertical lines are straight vertical.
- Horizontal lines are drawn to the 2 points on the 12×18 paper.
- Add details, remembering that horizontal lines (even on letters) need to be drawn in line with the points on the end of the horizon line.
- Color in with colored pencils. Shade one side of each building darker than the other to help create depth.


