Understanding the element of form through making paper sculptures
Lesson Objectives: Students will learn about the element of form, and create a simple sculpture out of a paper bag and some tissue paper
Time Required: 1 session
Reference: Instructions handed out by KCLS during pandemic curbside services.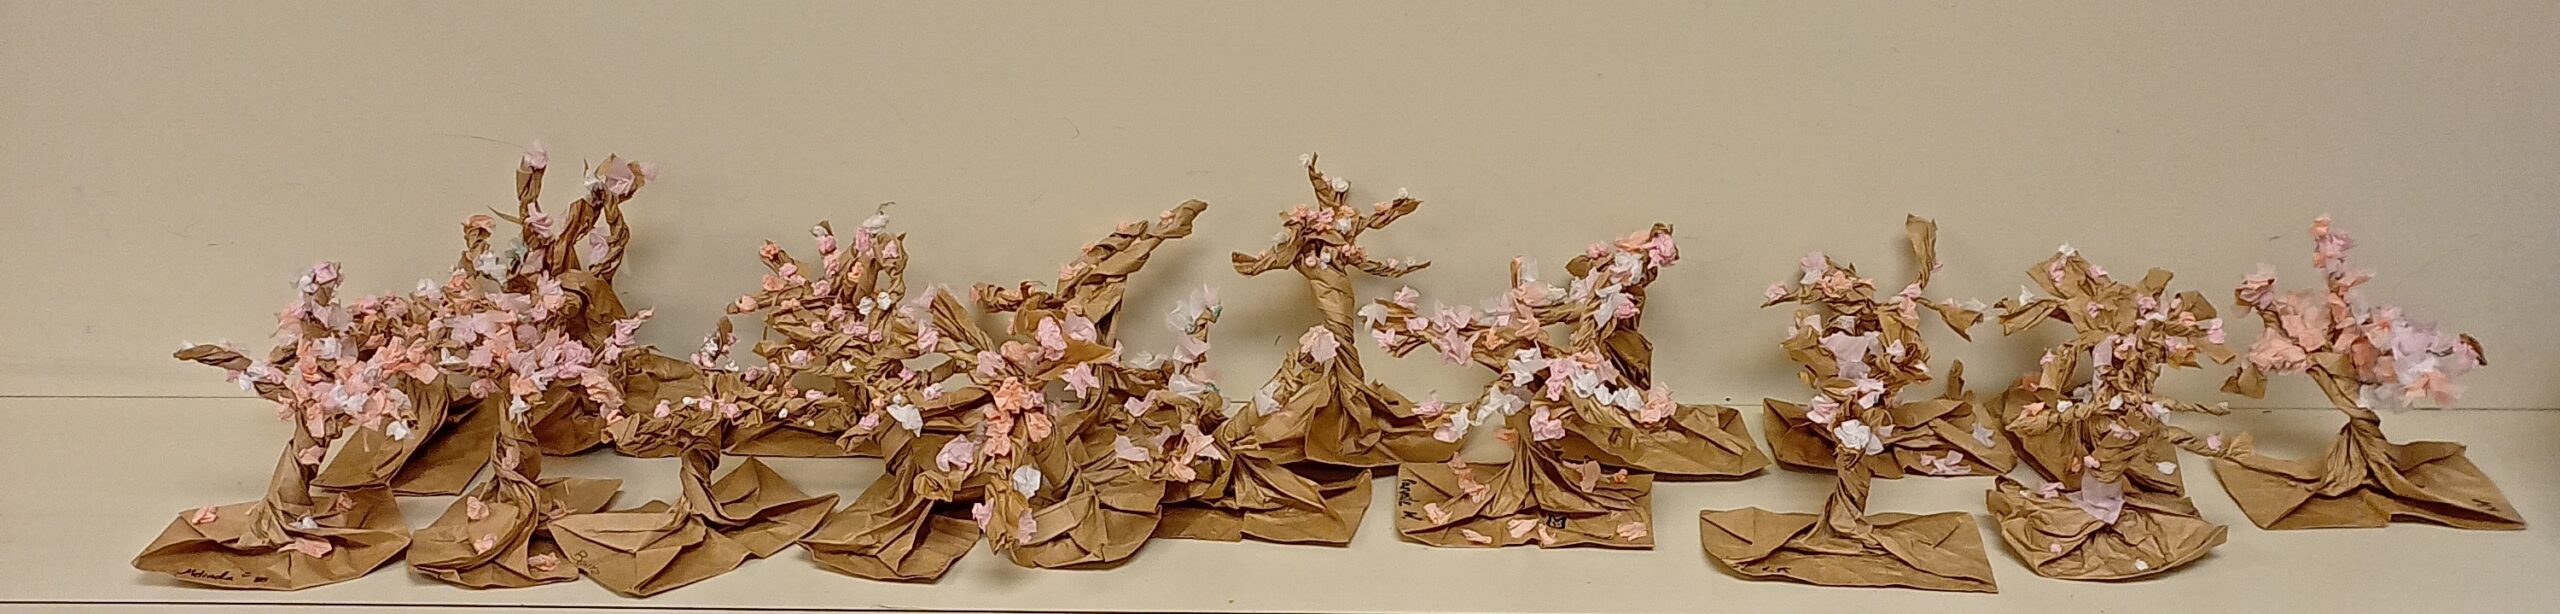
Materials:
Brown paper bag
Scissors (most classrooms have scissors)
tissue paper in 1 – 1 ½ inch strips
Small square of scrap paper or parchment paper to keep glue on
Liquid white school glue.
Toothpick
Presentation: Tell the class about the element of form. Point out that all sculptures include the element of form, but that we can use different techniques to bring form into 2D art too. Today we’re making a sculpture.
Procedure:
- Hand out a paper bag to each student.
- Have students crumple up their bags into tight little balls (This makes it easier to make them keep the tree shape later).
- Students flatten out the bags again.
- Open up the bag and put the bottom down against the table.
- Squeeze the bag together and twist close to the bottom to form a trunk. It’s ok if the bottom curls up a little when you do this. You’ll probably need to go around and help the kids realise they can twist closer to the bottom than they have. (You can pinch it together with your fingers to show them where, but don’t twist it for them unless they explicitly ask you for help.
- When you’re roughly half way up the bag, open up the top of the bag so that the bag looks sort of like a fancy cup. If the trunk untwists a little, that’s ok. If it untwists a lot try twisting it tighter.
- Cut the cup part into 4 or 5 strips all the way down where the trunk starts.
- Twist each strip into branches. When you are half way to the end, you can make another cut if you want to branch off again.
- Hand out tissue paper strips in three different shades (see notes) and scratch paper squares. They need enough to make at least 15 flowers but some kids will want more flowers and some will want only a few.
- Give each kid a little dollop of glue on their scratch paper. They only need a dime sized blob or less.
- Kids tear the tissue strips into squares and either pinch the center to form flowers, or scrunch the squares up into little balls if they find this easier, dip one side in the glue and place it on the tree.
- If there are trees that are frustrating the kids by untwisting, they can use a toothpick to place a little glue in a few spots to help it stay together.
- Remember to have kids put their initials somewhere on their artwork. The ground is a good place, but it can also be fun to draw it on like it’s carved into the trunk.
Cleanup
- Unused tissue paper strips (or even unscrunched ready torn squares) can go back in the supplies.
- Paper with glue goes in the trash.
Notes
- You will need three shades of tissue paper for this project. Three shades of pink, or two shades of pink plus white. It’s ok if they are very close in colour. Kids can combine two shades into one flower, or just mix different shades on the same tree, for a more lifelike appearance. It will work with just one colour tissue paper too if that’s all there is in the supplies.
- Some kids will want to add some fallen petals on the ground too, let them.
- These are not super sturdy, but I tried carrying my sample around in my tote bag the day of the lesson, and only lost a single flower so they should survive being sent home with kids. Make sure the last applied glue has at least 30 minutes to dry before sending home.
- This is a low mess, conversation friendly art project. It’s ideal for an art lead who lacks helpers and who feels a clay project will be too overwhelming.
- As you prepare for the lesson, make a sample (have your helpers follow along too). If you need a visual there should be a copy of the original instructions from the library in the binder, and there’s a very similar one here Paper Bag Gnarly Trees – Wee Folk Art.
- During the lesson, keep one bag for yourself and show each step as you go along. If a student messes up and needs to start over, there is the option of quietly offering them the one you’ve been twisting during class to allow them to keep going.
Variations
- Make a summer tree by giving kids three shades of green tissue paper.
- Make an autumn tree by using red, orange, and yellow tissue paper.
- Pale blue, white, and silver could possibly make a snowy winter tree.
- Instead of gluing on tissue paper flowers/foliage, leave branches bare and let kids create pumpkins, cats and tombstones out of construction paper to stick to the ground for a creepy Halloween forest of dead trees.

