LESSON PRESENTATION INSTRUCTIONS
FORM
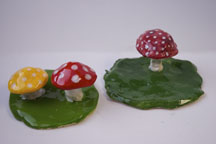
CERAMIC MUSHROOMS
Lesson Objectives: Students will learn slab, pinch pot, and scoring techniques to make 1 or 2 mushrooms. Form is recognized when all three dimensions are present (length, width, and height).
Time Required: 2 Sessions
Artist: Viola Frey, Double Grandmothers in Black and White Dresses
Materials (Session 1):
Clay
Rolling pins
Clay tools
Shallow dishes of water
Materials (Session 2):
Glaze
Paintbrushes
Dixie Cups
Presentation:
Discuss pinch pot, slab, and scoring techniques. Discuss form.
Procedure (Day 1):
- Roll out a ball of clay into a slab no less than ¼ inch thick and no greater than ¾ in thick. Carve initials in bottom of slab. Smooth edges
- Cut out 1 or 2 rectangular stems wide and tall enough to support mushroom caps. Using the scoring technique, attach stems to the slab far enough apart to allow room for the mushroom caps. Using a clay tool, make vertical and horizontal hatch marks in the clay surface like tic tac toes. ### Dip your finger in the water and rub it on the scored areas until it no longer feels slippery, but feels sticky or tacky. Then wriggle stems into place until you are able to lift up on it and it doesn’t come off.
- Roll remaining clay into 1-2 balls to make pinch pots. Carefully score the inside of the pinch pot and the stem and join the 2 pieces.
- Use newspaper to support the stems and caps while drying.
- Let dry 14 days, remove newspaper, and bisque fire in the kiln.
Procedure (Day 2):
1. Paint pieces with glaze.
2. Use 2-3 coats for vibrant colors.
3. Glaze cannot touch kiln shelves, so use stilts if necessary.
4. Let dry overnight and glaze fire in the kiln.

