LESSON PRESENTATION INSTRUCTIONS
SPACE
CAT IN THE WINDOW
Lesson Objectives: Students will learn about perspective using either watercolors or cut paper.
Time Required: 1 hour
Artist: Marc Chagall, Paris Through The Window (available online)
http://www.guggenheimcollection.org/site/artist_work_md_28_2.html
Source: The Usborne Complete Book Of Art Ideas, pages 62-63
OPTION 1:
Materials:
Watercolor paper
Watercolor paints: purple, blue, orange, various other colors
Paintbrushes
Water
Paper towels
Cats cut out of black paper
Pre-cut strips of black paper for the window frame
Presentation:
Discuss space and perspective. Images that are farther away appear smaller and lighter.
Images that are closer appear bigger and darker.
Procedure:
- Hand out watercolor paper. Write names on back. Orient paper vertically.
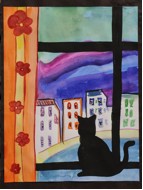
- With pencil, draw a line vertically down the left side of the paper about 1 ½-2 inches wide. With this new border of the paper, draw 2-3 curvy lines near the top of the paper for mountains. Draw a line about 1 ½ inches from the bottom of the paper to delineate the window sill.
- Using a very light purple, paint the very top of the paper as the sky.
- Using a bit more color, paint the 1st mountain.
- Continue in this manner until all mountains are painted, leaving the bottom white.
- Now add watercolor rectangles in various colors for houses overlapping the base of the mountain.
- Paint a blue lake.
- Paint in a window sill.
- On the left hand side of the paper, paint the white strip of paper orange for the curtain.
- Add in small rectangles for the windows on the buildings.
- When dry, glue on the pre-cut strips for the window frame and the pre-cut cat or dog sitting on the window sill.
Materials:
Light blue 9×12 paper
12 inch x 1 ½ to 2 inch strips of yellow paper with one wavy edge (for the curtain)
Cats cut out of black paper
Pre-cut strips of black paper for the window frame and Window Sill
Large scraps or full sheets of colored construction paper (check the recycle bin)
Markers
Pencil
Procedure:
- Hand out Light Blue paper. Write names on back. Orient paper vertically.
- With pencil, draw a line vertically down the left side of the paper about 1 ½-2 inches wide. Draw a line about 1 ½ inches from the bottom of the paper to delineate the window sill. Anything in the left hand column or in the bottom 2 inches of the paper will be covered by the curtain and window sill.
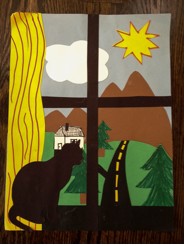
- Using construction paper, have the students construct a scene for the window. Give them examples of different scenes, ie farm, mountains, city, etc. Glue the scene elements to the blue paper.
- Explain to the kids about layering the different items in their pictures. For example, the mountains will need to be in the background and thus glued on first.
- Once their scene is complete have them glue on the black strips for the window panes and the window sill.
- Then glue on the yellow curtain on the left hand side.
- Add the black cat sitting on the sill.
- They may use markers to add detaiL to their picture but NOT to color things in.


