LESSON PRESENTATION INSTRUCTIONS
COLOR
BLOTTER BUGS
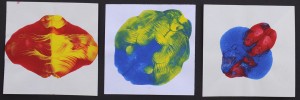
Lesson Objectives: Students use organic shapes created by blotting paints together to create a bug collage while experiencing the result of mixing two primary colors together.
Time Required: 2 Days
Artist: Junpei Sekino, The Mandelbot, Mouse Paint by Ellen Stoll Walsh,
White Rabbit’s Color Book by Alan Baker
Materials, Session 1:
Tempera Paint: Red, Yellow, Blue
5”x5” White construction paper squares,
enough for 3 per student
Blotter Bug Handout (in Kindergarten Sample Book)
Materials, Session 2:
12”x18” Colored construction paper
Crayons
Scissors
Glue Sticks
Black Markers
Presentation:
Explain how red, yellow and blue are the primary (meaning first) colors. These are the colors used to create all the other colors of the rainbow. When two primary colors are mixed together, the result is a secondary color; orange, green and purple.
Procedure, Session 1:
- Demonstrate how to make a blotter bug. First pre-fold the paper in half and then put two drops of one primary color on one side of the fold toward the center and another primary color on the opposite side. Fold the paper closed and rub it down. Open the paper and see what color was created.
- Guide the students through all three secondary colors together one at a time. Set the finished squares aside to dry.
Procedure, Session 2:
- Review primary and secondary colors. Guide the students to complete the Blotter Bug handout together with crayons.
- Demonstrate how to cut out the organic shapes and how to apply glue on the back of the shape being glued down instead of the background paper.
- Students will then cut out all three shapes. Have them glue down the handout on one side of the large construction paper before arranging and gluing down their bug shapes. (Handouts can be glued down for the students before class.)
- Students use a black marker to add bug details (antenna, eyes, legs, spots, etc.).
Option:
Students can mix paints and complete the handout at the end of Session 1.


