LESSON PRESENTATION INSTRUCTIONS
FORM
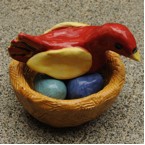
BIRD IN NEST
Lesson Objectives: Students will use various method to make a bird in a nest. Students prefect their pinch pot and hand building techniques. Form is recognized when 3 dimensions are present (height, width, and depth).
Time Required: 2 sessions
Artist: Elizabeth Catlett, Tired
Materials (Day 1):
Clay
Paper bag or cardboard placemats
Water
Carving tools
Plastic Knives
Materials (Day 2):
Glaze
Paintbrushes
Dixie cups
Presentation:
Discuss form: includes all 3 dimensions (height, width, and depth). Discuss the pinch pot, hand building, and scoring techniques.
Procedure, Session 1:
- Dispense pieces of clay.
- Roll one piece into a ball and form a pinch pot for the nest. Using a plastic fork, carve hatch marks into the pinch pot to look like a nest.
- Roll 3 very small pieces of clay into oval shapes for the eggs.
- For the bird, take a ball of clay and shape it into an oval. Pull out a head, pinching it to make it more narrow. Pull out a tail, pinching and pulling to create a nice tail shape. Keep molding until happy with the shape.
- Wings can be added on using the scoring technique if desired, or painted on later.
- Carve initial into all pieces.
- Let dry 14 days and bisque fire in the kiln.
Procedure, Session 2:
- After fired, paint with glaze.
- Use 2-3 coats for vibrant colors.
- These pieces will look best entirely covered with glaze. Stilts MUST be used in the kiln to prevent glaze from coming into contact with kiln shelves.
- Let dry overnight and glaze fire in the kiln.

