LESSON PRESENTATION INSTRUCTIONS
SHAPE
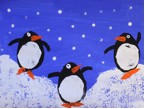
PENGUIN PRINTMAKING
Lesson Objectives: Students will make penguins using a printmaking technique.
Time Required: 1 hour
Artist: Katsushika Hokusai, The Great Wave Off Kanagawa
Source: http://www.thatartistwoman.org/2009/01/penguin-printmaking.html
Lesson Objectives: Students will learn about printmaking.
Materials:
- White construction paper 9×12 (or use blue construction paper)
- Tempera paint: blue, white, black, orange
- Paintbrushes, small and large
- Sponges
- Snowflake stamps (optional)
- Potatoes: 2 sizes. One large oval for the main black penguin body, and one smaller oval for the white penguin belly. Cutting handles into the potatoes for an easier grip is a great idea for these little hands!
Presentation: Discuss printmaking technique: using one tool (stamp, potato, wood carving) to make repeated images.
Procedure:
- BEFORE PRESENTATION: Have students paint entire piece of white construction paper with blue tempera paint and large paintbrush. You may pre-tape the paper down to cardboard to hold the paper down so it doesn’t move while they’re painting. Optional: Use blue construction paper to begin with.
- GIVE PRESENTATION: Pull kids away from their desks so they don’t mess with their artwork while it dries, i.e. have sit on the carpet in the front of the room. This will give the paint a bit of time to dry before moving forward.
- AFTER PRESENTATION: With small, square or rectangular sponges, students can sponge on white paint to form the snowy ground. Encourage hills and ledges for penguins to sit on. A good technique is place the sponge on the paper and then lift straight up instead of sliding it around on the paper or using the sponge like a paintbrush.
- Using the larger potato, dip into the black paint and make 2-3 penguins on the page, making sure they are sitting or sliding on snow and ice (not floating in the air!). Encourage the technique of placing the potato down firmly on the paper and lifting straight up.
- Using a small paintbrush, paint a small penguin wing on both sides of each oval.
- Using the smaller potato, dip into white paint and carefully make a print on each black oval for the belly. Again, placing it down once and lifting it straight up will minimize the smearing of the white paint into the black and make for a better print.
- Using small triangular sponges, print on little feet and a beak.
- With the handle of a paintbrush (the round, wooden end) dipped into white paint, make an eye or 2 on each penguin face. Dipping a clean paintbrush handle into black paint, add in the pupils of the eyes.
- With snowflake stamps or a clean paintbrush handles, add snowflakes to the sky.
Option:
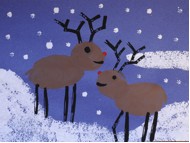
Make reindeer! Use pieces of cardboard dipped in black paint to make the antlers and legs.

