FORM
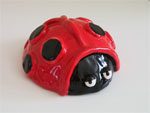
CLAY LADYBUGS
Lesson Objectives: Students will practice clay hand building by forming pinch pots and will learn how to effectively join clay pieces
Time Required: 2 sessions
Materials (Day 1):
Clay
Clay tools
Dishes of water
Materials (Day 2):
Glazes
Paintbrushes
Procedure, Session 1:
- Students begin with a piece of clay big enough to make a 2” wide ball. They are to make it into a ball and then create in into a small oval pinch pot around 4” wide.
- Demonstrate how to properly attach add-ons to the top of the pinch pot and explain that smooth surfaces tend to fall apart once the moisture leaves the clay if not properly joined.
- Give each student another piece of clay, smaller size than the first one. Make 6 small balls around 1/2”. Students will press down each of them to make them flat. These will be the black spots on the top of the ladybug.
- With another piece of clay make a long thin cylinder around ¼ inches to make the borderline around the ladybug’s face and to divide the top of the pinch pot to create 2 ladybug wings.
- Using clay tool, score the base of the add-ons and the point of contact on the pinch pot. Dip your finger in the water and rub it on the score areas until no longer feels slippery, but feels sticky or tacky. Then attach the circles and cylinder and wiggle it into place until you are able to lift up on it and it doesn’t come off.
- Using a wooden stick make 2 small perforations at the top of the head, these holes will help to place the pipe cleaner antennas after the project has been fired.
- Be sure to write initials on the clay piece, and set aside until bone dry.
Allow 2 -3 weeks to the clay to dry complete before putting them in to the kiln.
Procedure, Session 2:
- Glaze pieces.
- Students can pick their own color combination to paint the ladybug or follow the sample.
- Fire them in to the kiln.
- After they have been fired, place 2 pipe cleaners through the holes to create the antennae.


