LESSON PRESENTATION INSTRUCTIONS
VALUE
WATERLILY POND
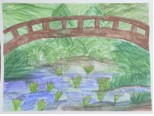
Lesson Objectives: Students will make a soft watercolor painting like Monet while learning the masking technique. Students will learn how to create value using watercolor pencils.
Time Required: 1 hour
Artist: Claude Monet, The Water Lily Pond
Materials:
Watercolor paper taped to cardboard
Small paintbrushes
Watercolor pencils
Rubber cement
Old-cheap brushes
Water cups
Paper towels
Presentation:
Discuss Monet and his style of painting. Explain what value is and how to achieve it with watercolor pencils: less color, more water equals light color high in value; more color with less water equals intense color low in value.
Procedure:
- BEFORE PRESENTATION: Hand out watercolor paper and write name on the blue tape. Orient paper vertically.
- Have the kids paint with rubber cement a bridge ¾ of the way up the paper. Have it go off the page. When you put rubber cement down on the paper and let it dry, it masks the paper underneath. When you rub it off later the paper that was underneath the rubber cement is white.
- AFTER PRESENTATION: Have the kids put in color where they think objects or vegetation are. Don’t draw lines and shapes to indicate where they will fill in. Where the vegetation is found is very loose and implied. The students may blend the colors too, i.e. laying them down next to each other so when they are wet, they will blend together.
- Have them clean up the pencils and when done, give them a paper towel, a brush and a Dixie cup of water. Remind them to clean their brush when going from a dark color to a light color. They can also dab the paper to make the color lighter.
- Put them on the drying rack and after you mount them you can have them wipe off the rubber cement and (optional) color in the bridge.

