LESSON PRESENTATION INSTRUCTIONS
SHAPE
STENCIL CITY
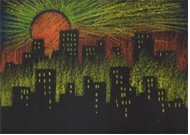
Lesson Objectives: Students will create an original visual image using pastels and simple stencils to develop and promote an awareness of shape, space, color, and how simple stencils and block outs are used.
Artist: Richard Haas, The Brotherhood Building
Time Required: 1 hour
Materials:
12×18 black and white construction paper
Rulers
Scotch tape
Scissors
Chalk pastels: reds, yellows, oranges, white
Presentation:
Discuss shapes. What shapes can you see in The Brotherhood Building? Discuss how stencils create a negative and positive image.
Procedure:
- On the sheet of white paper, draw a series of rectangles that resemble buildings with a ruler for nice, straight lines.
- Cut along the sketched line. There will be two pieces of paper with similar shapes. These will be used as the stencils.
- Place one of the stencils along the bottom of the black paper and hold it in place with Scotch tape.
- Using chalk pastels, color over the stencil onto the black paper.
- Move the stencil upwards on the paper, change the color and repeat the process. Reverse the stencil for different shapes or use the other stencil.
- Continue the process overlapping, continually monitoring the image as it is created. The city will take shape and details can be added after the stencil shapes have been established.

