LESSON PRESENTATION INSTRUCTIONS
COLOR
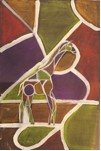
RELIEF AMAZON ANIMALS
Lesson Objectives: Students will learn how to make a relief picture while exploring color.
Time Required: 1½ hours or 2 days
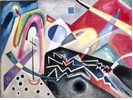
Artist: Wassily Kandinsky, White Zig-zags (available online)
http://www.renoirinc.com/biography/artists/kandinsky.htm
Robert Terrell
http://www.robertterrell.com/relief.html
Source: Dynamic Art Projects for Children, pages 29-32
Materials:
Practice paper
Pencils and erasers
Black construction paper 12×18, 2 per student
White tempera paint
Chalk pastels
Scissors
Small cut out foam board or card board
Elmer’s glue
Presentation:
Discuss relief paintings (part of the surface is raised). Discuss color.
Procedure:
- Hand out the exercise paper. Have them draw a large animal, using the whole page.
- Hand out the first construction paper. Put names on back. Using the whole paper cut it up with curved and straight lines with their pencils. Big shapes not small (takes too long with small).
- Outline the pencil lines with white paint.
- Take the 2nd piece of construction paper and have them draw their animal again on this sheet making sure it is big.
- As before, paint over the lines with white paint.
- Pass out the chalk pastels and have them fill in the shapes on the 1st piece of paper (the lines should have dried a bit by now), making sure they don’t have the same color next to each other. Set aside.
- Do the same thing with the animal.
- Let dry and cut the animal out carefully. On the back of the animal, glue on small cut outs of cardboard, foam, or mounting square (from hardware or craft store) to the back making sure you can’t see them. Apply glue to the cardboard pieces again and carefully glue on top of the first paper so that a part of the animal extends beyond the edges of the paper.

