LESSON PRESENTATION INSTRUCTIONS
COLOR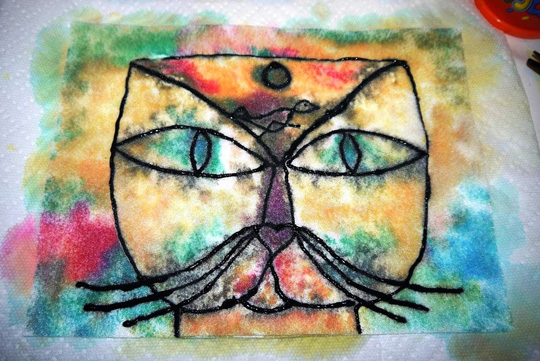
PAUL KLEE’S CAT AND BIRD
Lesson Objectives: Students will learn about color and how to create secondary colors using liquid watercolor (primary) colors.
Time Required: One hour first session
15 minute second session
Artist & Print: Cat and Bird by Paul Klee.
(available online)
Source: The Cat and the Bird: A Children’s Book Inspired by Paul Klee by Geraldine Elschner (available for checkout from the library)
Materials (Day 1):
9×12 sheets of white felt
Yellow, magenta and blue concentrated liquid watercolors.
Small paper cups for watercolors, 3 per student (one for each color).
Water bowl
Paint brushes
Sponges (small cosmetic or regular work)
Paper towels
Sharpie black permanent marker
Spray bottles for water
Brown paper bags to work on.
Materials (Day 2):
Green and blue oil pastels.
Presentation:
Read the book to the students. Discuss colors and primary colors in the book illustrations. Ask class if they know their colors: what are the primary colors? what are the secondary colors? Discuss Paul Klee’s art and how he used color. Demonstrate technique via projector.
Procedure, Session 1:
- Instruct students to write their name on the back of their felt sheet and brown bag. (make sure that they each have an old paper bag under the felt as it gets wet and heavy once they apply the color and water).
- Show students how to draw the cat face step by step with a black sharpie; draw a large ‘w’ type shape for the cat’s head; draw the nose and the cat eyes; draw the mouth, neck and whiskers; draw a heart shape on the nose; draw the little bird on the cats head along with a sun or moon above it.
- Give each student 3 cups with each primary color in them. Using a paintbrush and/or a sponge they can apply the color across the sheet of felt. It is important that they do NOT mix the primary colors at this point. There should be dots of pure primary color across the felt. Make sure they fill the space. Once they have done this they are ready to use the spray bottles and make secondary colors!
- Using the water spray bottles, have the students spray their felt concentrating on the dots of color and watching the color expand and mix with another to make a secondary color. Once the felt sheet has been sprayed all over and you can see all the colors, it can now be left to dry. You can set up a ‘spraying station’ in the classroom since there are limited spray bottles. Students finished early can make their own color wheel with crayons on paper.
- The felt sheets must dry for at least 4-5 days on a drying rack.
Procedure, Session 2:
- Using green and/or blue oil pastels, color the cat’s eyes and if desired, the bird and moon above them.

