LESSON PRESENTATION INSTRUCTIONS
TEXTURE
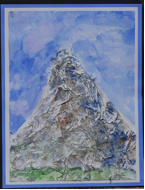
IMPASTO MOUNTAINS
Lesson Objectives: Students will create a textured mountain in the impasto style using tissue paper, acrylic paint, and watercolor.
Time Required: 2 sessions: 30 min for the first, 1 hour for the second.
Artist: Andre Derain, Henri Matisse Portrait
Source: http://thatartistwoman.blogspot.com/2009/08/tissue-paper-textured-paintings.html
Materials (Day 1):
Watercolor paper 9×12
White tissue paper
White acrylic paint
Elmer’s glue
Small pieces of tag board
Materials (Day 2):
Watercolor paints: blue, purple, white, black, brown, green, yellow
Paintbrushes
Tissue
Cups for watercolor
Paper towels
Presentation:
Discuss the impasto technique: using very thick paint to create texture.
Procedure, Session 1:
- Pass out watercolor paper and pencils. Write names on back.
- With paper placed vertically, draw rough outline of a mountain shape in pencil.
- Mix acrylic paint with glue to make it thick. Have students “paint” acrylic/glue mixture using their piece of tag board as a paintbrush into the mountain outline. The thicker tag board will hold up better with the thickness of the paint/glue mixture, and there is no need to be very precise in this step.
- While still wet, start laying down tissue paper into the paint, scrunching it up to add texture,
- Cover every portion of the mountain in this manner.
- Paint over the tissue paper with the acrylic/glue mixture and tag board.
- Let dry.
Procedure, Session 2:
- Pass out dried tissue paper mountains.
- Use different colors of blues for a watercolor sky. Use tissue to dab off paint in areas to create clouds.
- Paint mountain with black, brown, and a dark blue. Show how to mix black and white to get gray. Show how to use water to blend/dilute the colors. You can even add white for snow at the top.
- Paint base of mountain green and yellow for grass/trees.
- Let dry. Mount and return to students.

