LESSON PATTERN INSTRUCTIONS
COLOR
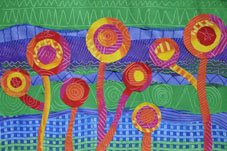
HUNDERTWASSER FLOWERS
Lesson Objectives: Teach the students about warm vs. cool colors, line, texture and pattern.
Time Required: Two 1 hour lessons.
Artist & Print: Friedensreich Hundertwasser, Man Find in Zahala, 1974, or Blobs Grow in Beloved Gardens, 1975. (available online) Great book about the artist for kids: Harvesting Dreams: Hundertwasser for Kids by Barbara Stieff.
Source: Deep Space Sparkle
Website: http://www.deepspacesparkle.com/2011/10/18/hundertwasser-art-lesson-for-kids/
Materials (Day 1):
Two sheets of white 12×18 construction paper
Tempura Paints: Red, Orange, Yellow, Pink, Green, Blue and Purple.
Utensils to make patterns in the paint, for example tooth brush, fork, wooden stick, sponge, notched spreader for caulk/grout. (Check Texture bin in the EA room for tools and ideas.)
Large paint brushes
Paper cups for the paint
Materials (Day 2):
Prepared Painted Papers
Scissors
Glue
Cups of various sizes to use as templates for cutting circles
Presentation: Using the book or information about the artist from the Internet, explain to kids the difference between warm and cool colors. This lesson could also introduce the idea of Texture, Line and Pattern.
Procedure, Session 1:
1. Set out Warm colors of paint first. Painting one line at a time, have the kids paint wide lines of different colors of the warm colors horizontally on the first sheet of 12×18 paper. It is ok if they overlap or merge together. They can even do multiple layers of paint.
2.While the paint is still wet, use a utensil to create a pattern in the paint. Swirls, circles, stripes, waving lines, etc. If the paint gets too dry to take the pattern, simply add more paint.
3. Repeat, line by line until the page is full. There should be room for about 4-5 stripes of color.
4. Repeat using the cool colors on the second sheet of white construction paper.
5. Make sure the names are on the back of both sheets of paper.
Procedure, Session 2:
1. Have the kids choose which paper they would like as their background and which they would like to cut their flowers out of.
2. Using different sizes of cups or stencils, cut various sizes of circles for the flowers. Stack two or three different sizes of circles on top of one another to create the flower.
3. Leave room to cut out some steams for the flowers as well.
4. Glue to the background page.


