LESSON PRESENTATION INSTRUCTIONS
FORM
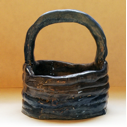
COIL BASKETS
Lesson Objectives: Students create a basket using coils. Students learn how to use coils to create a stable structure.
Artist: Africa, Nigeria, Bangboye of Odo Owa, Guggenheim Museum, Frank Lloyd Wright (available online)
Time Required: Two sessions
Materials (Day 1):
Clay
Brown paper bag placemats
Small cups or lids of water
Rolling pins
Clay tools
4” circle square, heart or other shape templates
Materials (Day 2):
Glaze
Paintbrushes
Dixie cups
Presentation:
Discuss the coil and scoring techniques. Discuss form.
Procedure (Session 1):
- Students will roll out a slab of clay and use a template to cut out the base.
- Students should sign the bottom of the slab before beginning their coils.
- Begin by making the first coil about 14” long. Join the coil to the base using the scoring technique. Make vertical /// and horizontal hatch marks on both the slab and one side of the coil. Wet both with a wet fingertip. Pinch off excess coil and join the beginning and the end to make a ring.
- Continue making coils, and joining them onto each other, building a wall.
- Continue building the pot with coils until desired height.
- Add a handle: using a thick coil and the scoring technique, add a handle. Make sure this coil is thick/wide enough to support the weight of the pot when fired. Slide handle on the inside of the coil pot and smooth into the basket.
- Carefully place newspaper to support the handles while drying.
- Let dry for 14 days, remove newspaper, and bisque fire in the kiln.
Procedure, Session 2:
- Allow each student to choose one or two colors of glaze to paint their pot.
- Don’t glaze the bottom of the pot! While painting, rotate the pot by turning the placemat. Or use stilts in the kiln to prevent the glaze from coming into contact with the kiln shelves.
- Let dry overnight and glaze fire in the kiln.

