LESSON PATTERN INSTRUCTIONS
FORM
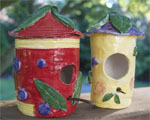
CLAY BIRDHOUSES
Lesson Objectives: Teach students how to create birdhouses out of clay, using add-on and texture techniques, and adding on a base and a roof/cover.
Time Required: Two separate lessons, at least 60 minutes each. Creation of the birdhouse takes about an hour. Glazing is the second lesson.
Artist: Pablo Picasso, Baboon and Young
Materials (Day 1):
- Clay, small cups of water, slip (water and clay mixed together to form a soupy glue), paper bags for work space, paper plates for project.
- Clay tools and texture tools; straws and a small circle cutting tool (such as a large glue cap or cookie cutter)
- Soup cans (14.5oz) to provide shape and support for birdhouse body (in clay cabinet)
- Plastic wrap or discarded plastic newspaper bags to wrap cans
- Paper templates for the roof circles
Materials (Day 2):
Glaze
Paintbrushes
Dixie cups
Presentation:
Discuss the element of form. Talk about how the body of the birdhouse is made, and how the circle shape is formed for the roof.
Procedure (Day 1):
1. Using the slab roller, make 12”x6” slabs, or smaller if using a smaller can. You will also need 5”-6” slabs for the roof circle. Use up the leftover clay in the clay cabinet for the roof circles.
2. Using the can as a guide, students cut rectangles for the body of the birdhouse. Roll the can across the length of the clay, then slice off the excess clay.
3. In the middle of the rectangle, cut a circle for the bird to enter from (I used the cap from a large glue stick), and cut a smaller circle for the perch (use a straw).
4. With a soup can wrapped in plastic, loosely roll the clay around the can, overlapping the edges, and score and slip the overlapping edges together. Don’t wrap the clay too tightly around the can or you won’t be able to remove it.
5. Once the wrap is secure, place the can on top of another flat area of scrap clay for the base of the birdhouse. Cut around the base. Score and slip the edges of the base and the birdhouse body and add the base to the bottom of the birdhouse. Smooth any rough spots and make sure it’s securely attached.
6. Cut the circle for the roof, and then cut a line from the center to the outside edge. Overlap to form a slight cone shape. Score and slip the overlapping pieces and attach them together. Set aside on top of some wadded paper to support the shape.
7. Apply texture and add-ons to the birdhouse and the roof to decorate.
8. Once the birdhouse is completed, gently twist the can out of the birdhouse body. Discard plastic. Allow clay to dry for two weeks and then fire in the kiln.
Procedure (Day 2):
Glaze birdhouses with three coats of glaze for vibrant colors. Fire in the kiln.


