LESSON PRESENTATION INSTRUCTIONS
FORM
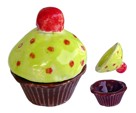
CERAMIC CUPCAKES
Lesson Objectives: Students will practice clay hand building by forming pinch pots and will learn how to effectively join clay pieces. Form is recognized when all three dimensions are present (length, width, and height).
Time Required: 2 Sessions
Artist: Barbara Hepworth, Unknown
Materials (Session 1):
Clay
Silicone cupcake holders (in clay cabinet)
Cupcake baking trays (bring from home)
Clay tools
Shallow dishes of water
Materials (Session 2):
Glaze
Paintbrushes
Dixie Cups
Presentation:
Discuss pinch pot and scoring techniques. Discuss form.
Procedure (Day 1):
- Students begin with a piece of clay big enough to make a 2” wide ball. They are instructed to roll and smooth the ball.
- The ball should then be placed into a silicone holder in a muffin tin, which provides support to press the clay against. Like making a pinch pot, press both thumbs into the middle of the ball of clay and begin pressing down and out. The center should be pressed down the most so the sides come up to form a kind of bowl. The sides should then be pressed firmly into the holder to ensure a good impression. Smooth the top of the pinch pot.
- Give each student another ball of clay, the same size as the first. Make a pinch pot that will sit upside down on the clay in the silicone holder. Smooth the edges with a wet fingertip.
- With a small piece of clay, roll a small ball to create a cherry. Demonstrate how to properly attach the cherry to the top of the pinch pot using the scoring technique. Using a clay tool, score the base of the cherry and the point of contact on the pinch pot by making vertical and horizontal hatch marks in the clay surface like tic tac toes. ### Dip your finger in the water and rub it on the scored areas until it no longer feels slippery, but feels sticky or tacky. Then attach the cherry and wriggle it into place until you are able to lift up on it and it doesn’t come off.
- Carefully remove the silicone holder. Carve the initials into the two pieces and set aside until bone dry.
- Let dry 14 days and bisque fire in the kiln.
Procedure (Day 2):
1. Paint pieces with glaze.
2. Use 2-3 coats for vibrant colors.
3. Glaze cannot touch kiln shelves, so use stilts if necessary. You may find that the top of the cupcake with the cherry attached is easiest to stilt in the kiln on its side.
4. Let dry overnight and glaze fire in the kiln.

