LESSON PRESENTATION INSTRUCTIONS
FORM
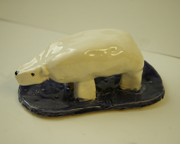
CERAMIC BEARS
Lesson Objectives: Students will use the pinch pot method to make a bear.
Students are introduced to the technique of pinch pots, slabs, and scoring. Form is recognized when 3 dimensions are present (height, width, and depth).
Time Required: 2 sessions
Source: http://www.thatartistwoman.org/2010/05/how-to-make-clay-polar-bear.html
Artist: Kathe Kollwitz, Self-Portrait
Materials (Day 1):
Clay
Paper bag or cardboard placemats
Water
Carving tools
Rolling pins
Materials (Day 2):
Glaze
Paintbrushes
Dixie cups
Presentation:
Discuss form: includes all 3 dimensions (height, width, and depth). Discuss the pinch pot, slab, and scoring techniques.
Procedure, Session 1:
- Dispense pieces of clay.
- Have the child cut off a piece of clay (a bit less than ½ of the total amount of clay). Roll it to about ¼ inch thick.
- Cut out an oval shape. Carve initials into the bottom of the base. Smooth edges with a wet fingertip.
- With the scraps, mold 4 bear legs, roughly rectangular, short and stubby.
- Attach the legs to the base using the scoring technique: carve hatch marks //// horizontally and vertically to create tic tac toe marks ### on the base of the leg and the slab. Add water to both surfaces to create slip (glue). Wriggle the leg into place on the base.
- Pay attention to the placement of the legs. This is a bear, not an alligator! The front and back legs should be far enough apart to suggest the length of a bear, not any other creature.

